Manual
Table of contents
- Administrative settings
- Project, experiment, and sample
- Analytical runs addition
- Analytical runs management
- Export
- Protein view
- Queries
- Tasks
Administrative settings
An admin user has access to the admin menu item of the “Edit” menu with which users, instruments, materials and protocols can be added, updated or deleted. The created entities can then be used by all users when adding runs or providing metadata.
Controlled vocabulary or ontology terms are used to define the different properties of an instrument for example. Although this requires some effort to set up an instrument, protocol, …, it makes to export of data into the standard formats (mzIdentMl, mzTab) a lot easier.
User management

This dialog enables an admin user to add, update and delete users and their related entities (groups, roles and permissions). A user has one or more groups, a group has one or more roles and a role has some permissions. The default permissions are mostly database related (create, delete, read and update). The user role management is pretty basic for the moment but enables colims to add features related to this in the future.
Instrument management

This dialog enables the configuration of mass spectrometry instruments. Clicking on the “add” or selecting an existing instrument and clicking on the “edit” button opens the instrument management dialog.

An instrument is defined by a type, a source, a detector and one or more analyzers. Clicking on “SOURCE” in the left hand panel for example, shows the available and and added source ontology terms. If you want to add or edit an existing source, click on the “add…” or “edit…” button respectively.

Clicking on an existing source ontology term shows the ontology label, the term name and accession and the term definition. Adding a new term pops up the “Ontology Lookup Service (OLS)” dialog.
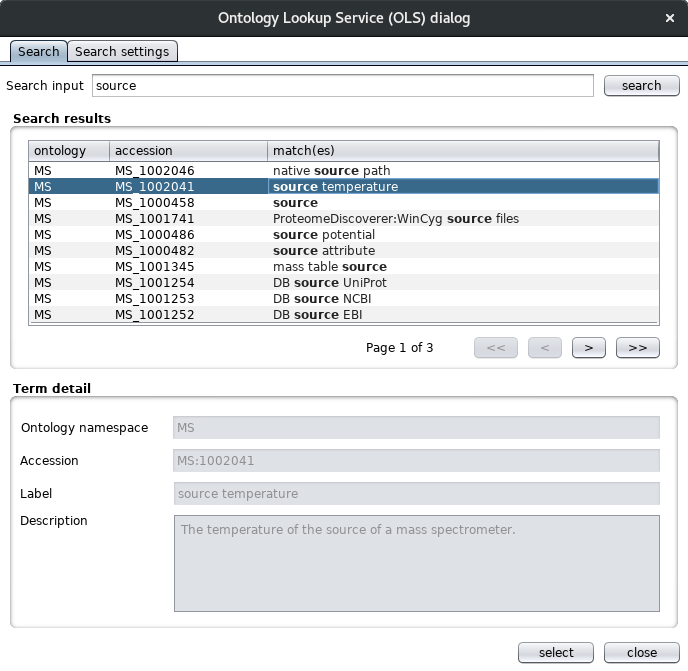
This dialog uses the ontology lookup service rest service for browsing different ontologies for the appropriate term. The same dialog is also used for defining material and protocol entities for example. In the “Search settings” tab, the ontologies and search fields can be configured. Clicking on the “retrieve all” button gets all the available ontologies to choose out of.

By default, only the label and synonym fields are searched as shown in the search fields panel.
Material management
A material has a species ontology term and optional tissue, cell type and compartment terms.
Protocol management
A protocol can have reduction, enzyme, cell based, chemical labeling and other ontology terms.
Project, experiment, sample and run management
In order to store analytical runs in an organised way, colims provides the following hierarchical structure; a project consists of one or more experiments, an experiment has one or more samples and a sample contains one or more analytical runs. When storing a MaxQuant experiment for example, a user has to select a single sample where all the runs of the experiment will be added to. A user with the right permissions can remove projects, experiments, samples and runs but caution is advised because all underlying database entities (spectra, peptides, protein groups …) will be removed as well.

Project permissions can be configured in the project metadata management panel. In the experiment metadata management panel, a user can add additional information like a storage location and attachments (images, text files, …). The attachments are stored in the database in binary format so don’t use it for storing RAW or other big files. Used protocols and materials can be added in the sample metadata management panel. In the analytical run management panel, an instrument, a storage location and attachments are configurable.
Analytical runs addition
Click the “other…” button on the bottom left of the main page. From the menu as seen below, select the “add run(s)…” option.

This selection will redirect you to analytical runs addition panel. At the moment, colims supports PeptideShaker and MaxQuant data. Choose the data type on the left hand side of the first panel of the run storage wizard.
Data type selection

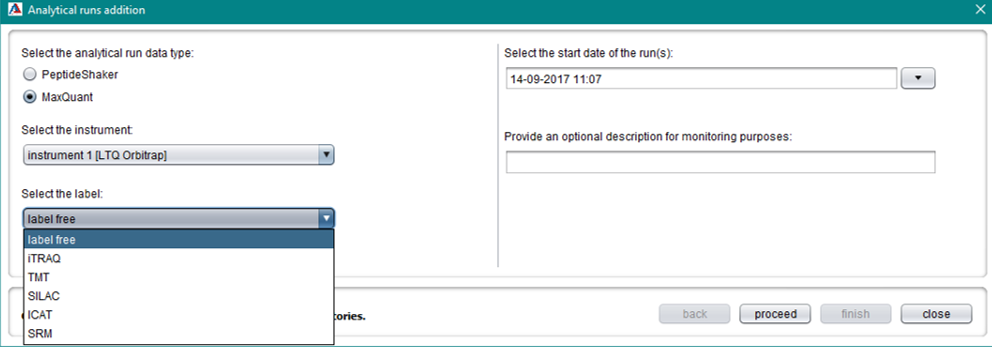
For MaxQuant data, select the relevant quantification method in order to parse quantification information. Providing the correct quantification method metadata is important for MzTab export for example. For non-labeled experiments, choose “label free”.
File selection
PeptideShaker and MaxQuant have different input data to parse, so colims provides two different panels for file selections.

This window allows the selection of PeptideShaker files and the used FASTA file. After adding files, the finish button will send a task to the storage module and the parsing and storage process will start.

Because a MaxQuant experiment could have different combined folders, the user has to select the relevant one, as well as the used mqpar.xml file. The mqpar.xml is an xml file used for mapping runs and protein quantification values by using experiment names. For this reason, the user has to provide experiments tags when setting up the experiment in MaxQuant.
To avoid unnecessary growing of the database, storing unidentified spectra and proteins from the contaminants file is optional.
Fasta files
While PeptideShaker import requires a single fasta file, MaxQuant uses a primary, a contaminant and optional additional FASTA files. Colims stores FASTA metadata information for export purposes.

A FASTA database has to be saved once before using it for storing runs. FASTA files are editable and user can add another different versions of the same FASTA.

When adding FASTA files to the database, choosing the correct header parse rule (for MaxQuant only) is crucial for successfully parsing the data to import. The header parse rule enables colims to link the protein accessions from the FASTA database to the protein IDs from the MaxQuant result files. The result of the header parse rule can be previewed by clicking on the “test” button next to the parse rule drop down box. If necessary, a new regular expression (parse rule) can be added by clicking on the “add” button.
Providing the database name is again important for exporting data. You can choose out of all databases listed on the EMBL-EBI website.
Label selection
The label selection dialog is shown when importing a SILAC or iCAT MaxQuant experiments. In order to save database space the user is asked to choose the labels of interest whereas those experiments have many labels.

Click on the optional header(s) from the “available” frame and move it to the “added” frame. All selected optional quantification values and mandatory ones will be stored in the database.
Analytical runs management
Click “other” button on the bottom left of the main page. From the menu as it is seen below, click “view runs…”.


Analytical runs can be viewed, updated and deleted.
Export
Colims generates mzIdentML files - the HUPO-PSI standard for protein/peptide identifications - for submissions to ProteomeXchange. Another export option of colims is mzTab - a light-weight, easy to parse tab-delimited file format. It contains minimal information required to evaluate the results of a proteomics experiment.
MzIdentML export
Select one or more runs from the analytical runs management dialog and click on the “export” button. Provide a file name and export directory and optionally export the spectra in MGF format.
MzTab export
The first step to export an mzTab file is to click “other” button on the left buttom of the main page. From the menu as it is seen below, click on “export to mzTab…”.

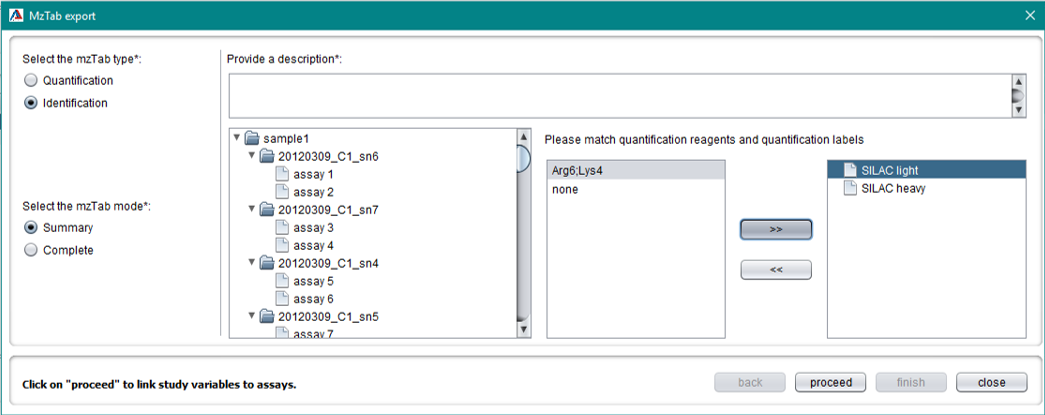
The mzTab type is available on the left hand side of the first mzTab export panel. Assays are automatically generated depending on the number of analytical runs and quantification reagents. For some labels used in MaxQuant, the user will be asked to match quantification reagents and quantification labels.

In the second mzTab export panel, create study variable(s) and match them with assays. The mzTab export might take several minutes depending on the size of the experiment.
Protein view

The protein view panel is accessible by clicking “Proteins” tab on the right hand side of the main page. This panel displays protein groups for the selected analytical run(s), peptides for the selected protein group, and peptide-to-spectrum matches (PSM) for the selected peptide. Double clicking on a PSM shows the annotated spectrum.
Queries
The queries panel is accessible by clicking “Queries” tab on the right hand side of the main page. This panel allows direct access to the database by using SQL queries.
Tasks
Go to this panel by clicking on the “Tasks” tab on the right hand side of the main page. The stages of the analytical runs addition process are shown in the activity panel. If any errors occurred during parsing, the failed task will be shown in the errors panel and the user can modify the storage task and rerun. Completed processes are shown in the completed panel.